ShopDreamUp AI ArtDreamUp
Deviation Actions
:thumb88787998: Photography can be many things, a hobby, a job, a pastime, a passion. Many of us make it most if not all of these. Photography tends to bring people together. No one will ever learn every single aspect that there is to learn with photography, so we are always looking for more information. We get together to talk products, ideas, omitted to ask/answer questions concerning the technical aspects of it. Always looking to learn something new and to share any and all information we can, the makers of #iPhotograph have come up with a new idea. We are going to be putting out a newsletter every few weeks, sharing information about the technical aspects of photography, about new products, and about the culture that surrounds photography. This newsletter will contain tutorials, product reviews, mini articles about photography culture, interviews with known photographers, and features. So without further adieu here is #iPhotographs first iPhoto Newsletter;
POETRY OF HEARTS: An interview with Emilly Rainbird given by

Many professional photographers in this day an age take pride in their clean, well focused, and “modern” looking photos. However, the art of photography spans beyond how “clean” or “well balanced” photos can be, emilly has shown us that. Her work in the world of photography is something beyond normal photographic composition and sharp details and colors, and this is her story.
Let's begin with the basics. What's your name and from what part
of the world are you?
Salut and hey to everyone.
first of all I want to thank you for your support. This is my first interview, I am very honoured by your selection.
For those who don't know me yet, My name is emilly rainbird and I am an emotional poet. I am located in north-rhine/westphalia, Germany
How old are you?
I don't think this question is important,but for those of you who are curious I am twenty one years old, an age i would love to be forever.
i don't like time. it's an unfair thing.
How did you first become interested in photography?
It's been so long since I first got in touch with photography.
I think I was no older than four years when I became totally fascinated by the analog camera that my father had. I always wanted to take pictures on my own. I also was fascinated by film with the cine camera which was too heavy for me.
When I got my first camera I took so many pictures of everything that was in my life. Over the years it became more and more important to me, and in 2004 i got addicted. Everything started with my first simple digital camera.
What kind of camera/camera equipment do you use?
By now I have several cameras. I use my canon eos 400d the most, but I am still content with shooting analog photography. I love to take real pictures, I want to catch real colours, and for this I use my lomo lca or my polaroid sx 70 landcamera. I love polaroids.
one week ago i got a voigtländer, my new baby. I can't wait to take my first pictures with her.
Do you have any formal education or training in photography?
All my work is a result of self education. I have never had training or anything like that.
What style of photography is your favorite?
I take pictures of emotion. I prefer to take the artistic trip by a feeling. Nothing is ever arranged, and I really hate a fake smile.
Do you prefer to shoot alone or in a group?
In all my years of doing photography I have shot alone, or just with good friends. It's easier to take pictures alone or just with an other person in tranquility. otherwise it would be too loud to apply occam's razor.
What's your favorite photo you've ever taken and why?
My favourite photo.. oh I don't have to think about this one very long. It is 'april', a polaroid I took some years ago. there were just three seconds. I saw this girl and took my camera out of my bag quickly, because the little girl and the balloon started to run away. It is a picture I will never outreach anymore. It is like a poem. I really love it.
Alright, let's make this a bit deeper, shall we? What does
photography do for you as a person? Is it merely a way to express
yourself through art or is there a more personal connection involved?
Sure. Let's get deeper.
Photography is a drug for me. I am sure that I could never live without it anymore.
It is an easy way for me to deal with my feelings and to catch moments. Silent moments. but I like the result of photo you can read. It is like an emotional poetry for me.
To many people not involved in art, a photograph is only a
picture, an image capturing a moment in time forever. To you, what
is a photograph? How would you define photography for yourself?
It is like I answered, before, these people who are not involved in art, especially in art photography - i am sorry for them because they will never be able to see the beauty of something special. A photograph is like a painting. It is a secret. You have to look behind the frame and you have to read it. you could catch lines of a message or feeling. the real content is in the eye of the beholder, or sometimes in his or her heart.
While many photographers in this day and age are focusing more and
more on images that have accurate details, clean focus and colors
that are vivid and true to life, you've found beauty in the faded
out, retro look of older days when things like HDR photography
didn't exist and put a modern spin on it. Is your style a reaction
to the cleanliness of modern photography or is there some outside
inspiration at work?
I think I have found my special style and I would never ever change it. With clean focus and accurate details I could never identify. For me these are soulless beauty images.
They don't touch me.
When I look back to my first pictures on deviantart I can see a growth in my pictures, and that growth continues to this day. There are just to many pictures I still have to take.
What's your editing style of choice? I've noticed that many of
your images seem to have texture overlays or double-exposure style
photos, is this computer editing or is there a camera technique
you use?
Most of my pictures are born in this beauty, but when I use computer editing I like to use adobe photoshop CS3. It is a way to play with colours, frames, and shadows.
You have an interesting eye for composition, some of your photos
would be deemed "bad subject framing" or "out of focus" and other
such phrases, yet you've proven conventional photography
techniques wrong. How do you look at the world when you have a
camera with you?
Right. my work is not as clean as other styles.
you can love it or hate it.
Don't think, just shoot. Thats my style.
beauty is hidden sometimes. You have just to look around in another way and you'll find it.
that was always how I viewed the world.
Well, that's all for now. Thanks for your time!
Well thank you!
It was a pleasure for me.
And in the end I want to recommend a song
warmly to all of you: "lady & bird - la ballade of lady and bird"
<3 cheers, emilly
What's This Button Do?
Mike Butler aka

Welcome to 'What's This Button Do?', a weekly iPhotograph how-to article covering topics ranging from beginner to advanced on all things digital photography. I want to refrain from doing standard tutorials as the internets are abundant with those, as well as your local bookstore+coffeeshop conglomerate. Remember, this a a flexible medium, and there are many ways of skinning many cats. This is just how I get it done. Feel free to note me any questions so that I may have material for future articles!
Today I'll keep it simple and answer a few questions that I've been asked recently pertaining to portrait photography.
Q: I have a model that wants to pose for me! Now what do I do?
A: Take some time to sit with the model if you're not familiar with them already and attempt to find out what makes them tick. Anyone can arrange a few lights and take a decent headshot, but a true portrait captures the personality and essence of the subject. Same concept applies to still photography; anyone can snap a shot of a bowl of fruit, however that winning shot is one that the viewer can look at and be able to comprehend just what that pear is all about should he have never seen a pear before in his life. The challenge for you as photographer is to find a way to bring that out in your image.
Q: How do you take colors into consideration for the outfit, location and lights?
A: First decide whether you want to shoot high or low key. High key is bright and cool colors, bright lights. Shadows are usually annihilated by at least three lights consisting of your key (main), fill and background light. Your key and fill should be even, as close to 1:1 as you can meter. We'll cover metering some other time. Low key is just the opposite; warm to dark colors with dramatic shadows. Rather than a three point light setup, low key is usually one light or two lights with one modified with either a grid, gobo or snoot depending on the effect you want. Your key is going to overpower your fill here, somewhere around 8:1. When you've decided on your approach, continue accordingly. If you're shooting in a studio, pick a light (or white) colored background for high key and a dark one for low key. If you choose to use a black background, velvet is best as it doesn't reflect light as much as paper will. It is still possible to get a pure black background with paper, as long as you keep your key from hitting it. Now as far as clothing goes, I'm not a designer but I do use a color wheel from time to time. Remember complimenting colors are opposite each other on the wheel. The color of your lights is very important! If at all possible, avoid mixing lights. It only complicates life. If you want to use hot lights, use hot lights...strobes with strobes, halogen with halogen etc. Your result will be even tones and colors. Also remember to balance! You have no idea how many of us shoot off entire cards only to realize they had the camera set to daylight balance and were shooting under flourescents. I used to use a 16% grey card to meter, however lately I've gotten lazy and shoot raw, adjusting white balance as part of my workflow.
Q: How do you shoot only with sunlight without the pictures becoming underexposed or overexposed? The sun keeps changing... how do you do it? Also I have seen photographers use in-camera flash with sunlight, how does that work?
A: First things first, try to avoid shooting outdoors at “High Noon”. Having such a direct natural light source can lead to some pretty frustrating times without having a few tricks in your bag (and assistants to hold them). I prefer to shoot a dusk, which gives me an hour or so of the best possible natural light and I can still shoot in the dark. As for your exposure, meter! If you can't meter, bust out the sunny 16 rule: Clear skies @ f/16 shutter speed = ISO. So on a cloudless summer day, f/16 ISO 100 shutter speed 1/125. As the sky gets darker, start stopping down. At it's most basic, flash would come into play to fill in shadows when shooting outdoors. Unless you're talking about crosslighting, which is an entirely different animal.
Q: How do you use artificial lighting? I have read that you have 3 basic lights around the model. How do you keep the image from looking flat?
A: I already mentioned your basic 3 light setup; key, fill and background. Keeping your key away from your camera will solve your flat lighting problem. For portraits and headshots, the goal is to have a shadow on one side of the face of your subject. Try to keep your key elevated and off to the side of your subject (upper right is most common and natural). Mastering artificial lighting will take lots of time and patience and is extremely rewarding.
Q: How do you work with shadows?
A: You create shadows in the same way you create light. Refer back to what I said about low key photography; your key to fill ratio should be much higher than if you were shooting high key. If you want to eliminate shadows, reduce the ratio.
Q: How do you work with the model to make him/her look the best? How do you work body types? What about angles and composition?
A: Find what compliments the model. When shooting, rely on poses and facial expressions that accentuate the models' finer characteristics. You're most likely getting paid to make this person look good, so if your model has a lazy eye don't shoot her head on! This goes back to what I said earlier about finding out just who your model is on the inside. For headshots, a ¾ profile is most common, but there is no hard rule. For portraits, my only advice is to avoid the “MySpace” angle. Composition is entirely up to you. Personally I like to balance negative space when doing portraits. Also, be aware of your crops! If your models hands are in the frame, don't cut off the fingers. For basic composition, obey the rule of thirds. Imagine three horizontal lines and three vertical lines in your frame. Your subject should sit on an intersection somewhere 1/3rd in the frame.
This about wraps up this weeks 'What's This Button Do?'. I look forward to your questions, and I'll do my best to make this as frequent as possible!
Mike Butler, a portrait/event/pinup photographer, has read many books, attended many lectures, taken many pictures, answered many questions and has had a camera at arms reach for over 15 years. Mike Butler is not a teacher, just a guy that kinda knows what he's doing.
How to Post Process Your Photos in Photoshop and How To Reshoot without editing
By

Photoshop is a very useful tool to any photographer. Today I am going to walk you through some basic post processing work, from levels and curves, to color and highlights, to shadows and contrast, and finally, cropping.
Now keep in mind that this technique will not make you a good photographer per se, it is just going to show you how your photo would look if it were shot with proper technique. This is in no way a substitute for a well shot photo. After teaching you these techniques I will be walking you through taking the same photograph with the proper settings, making these editing steps a simple fine tuning process for the finished product.
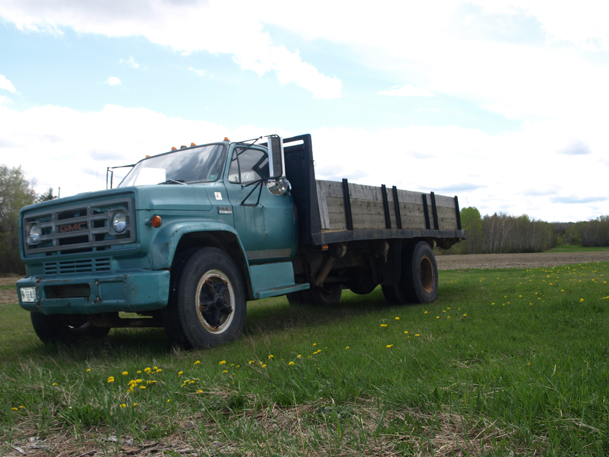
First we assess the photograph and find out exactly how we want it to look. What we are looking for is contrast, colors, depth, and sharpness. If we are lacking these it should be pretty obvious.
fc05.deviantart.com/fs29/f/200…
In this photo we happen to be lacking quite a bit. As you can see the sky is pretty washed out, there is a large glare on the window of the truck and the contrast leaves something to be desired. Overall this photo needs a lot of work and I personally would never consider using this photo the way it is for my gallery.
Now we assess what went wrong, I am going to go over the camera settings used and explain what could have been changed. Open Photoshop and use the keyboard shortcut (for PC) Alt+Ctrl+Shift+I (if you are on a mac it is in the file menu under file info) We are clicking on Camera Data 1
To View Camera Data in Photoshop
Alt+Ctrl+Shift+i Then click on Camera Data 1 (or File-File info- Camera Data 1)
• F-Stop F/8.0
• ISO speed 100
• Shutter Speed 1/160
With this photo, the flash fired because I shot it in full auto mode and the camera felt that there was not enough light to take the photo without the flash, despite good lighting conditions.
But for now lets go ahead and edit this version of the photo to see what we can do to make it look better
.
Unless otherwise stated the path to the function I am using is in Image-Adjustments
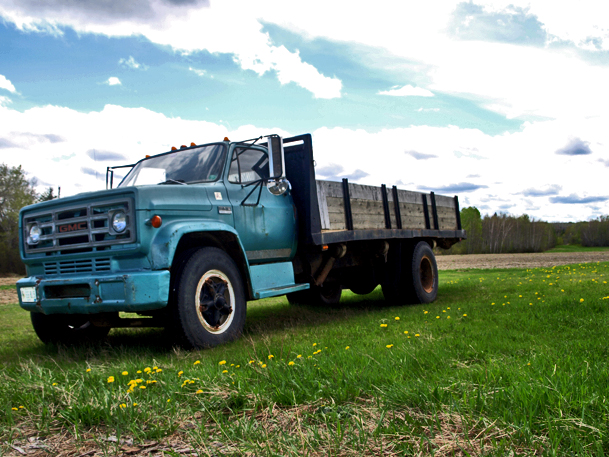
I am going to start off with the levels, first I am going to click auto and see what they suggest. They didn’t suggest much of a change, so I went ahead and dragged the far left stop more towards the middle this will darken the lows, I also moved the middle marker more towards the right as well.
I am going to skip over the curves as I feel that with this particular shot it will not help us all that much.
We are at brightness/contrast now, I moved the brightness down to -11, to darken up the sky a little and jumped the contrast up to +18 to bring out the colors a little stronger, already we are looking at a better photo.
The biggest change we are going to make is with Shadows and Highlights. We are going to keep the shadows where they are with this shot, and drag the highlights up some. You can see in the preview how it's bringing out the sky better than before, as well as making the grass greener. To further this effect we are going to up the color correction a bit. Remember when doing these adjustments to photos do not overdo them, because you can really ruin a photo if improper editing technique is used. I used about 35% Highlight adjustment and +44 midtone contrast as well as +44 Color correction.
As you can see here, fc08.deviantart.com/fs29/f/200… our final shot is greatly improved from the original, but don't you wish you could have done this without all these steps?
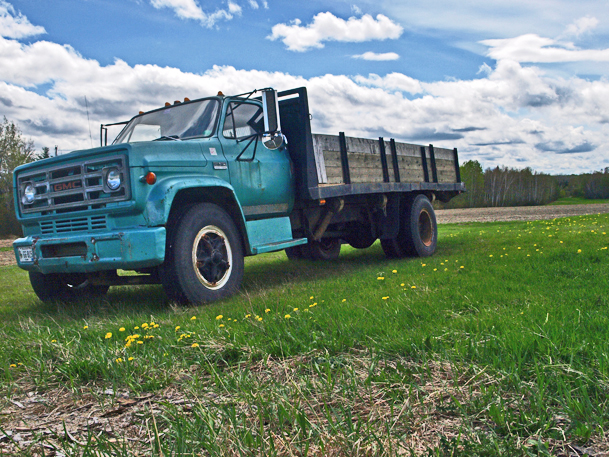
Doing this without the above steps is quite simple, it just may take a few more minutes while shooting the photo. Make sure to set your camera properly, think of all of the following before pressing down on that shutter. Remember:
How to Properly Take The Photo
In order to get the color and contrast that we want to see in the sky, we need to shoot with a higher F-Stop, which gives us a little more depth, the ISO also needs to be set to around 400 to keep the clouds from washing out and to decrease the blue tones in the sky, and a faster shutter speed will help as well.
So when reshooting this exact photo, I used the following settings.
• F-Stop F/13
• ISO 400
• Shutter Speed 1/640
And this time I shot in full manual mode, the flash did not fire, and I used a centerpoint metering, just because I find it easier to meter just the subject and let the rest fall into place.
The final unedited reshot version can be seen here fc01.deviantart.com/fs30/f/200… I think you will be much happier with this than either the original or the edited version.
Understanding what each of these settings does is crucial to shooting a proper photo. take your time and play around with the settings until you get the photo that you are looking for. If you have any questions regarding any of this at all please feel free to contact one of us in the club we would be happy to walk you through it a little more.
Canon L Glass - A Lens review by

What can be said about a lens that’s already had tons of reviews tossed around the Internet? A quick Google search reveals tons of reviews with all kinds of technical details. I'm not going to go as much into the technical stuff, this review will be mostly from my personal experience.
The lens I’ve been asked to review is the Canon EF 70-200mm f/2.8L IS, which I’ve owned for nearly one year. I mainly shoot this lens on a Canon EOS 1D Mark IIN body, which as you may or may not know, has a 1.3x crop giving the lens an equivalent of 91mm to 260mm (or 112mm & 320mm on a 1.6x crop body). The lens itself is well built, certainly worthy of its L designation by Canon. It’s rather weighty when stacked onto a body like the 5D/20/30/40D/Rebel bodies (unless you have the battery grip) so when using a neck strap you'll find the barrel of the lens to point downward. You might also find yourself carrying it against your stomach straight down especially in tight spaces. Image quality is superb, details are very sharp when the lens is stopped down from its 2.8. One interesting side note that I found out from dpreview.com’s review of this lens is that the lens isn’t the sharpest at f/8 and really varies from mm to mm when zooming from the 70 to 200mm marks. The lens at 70mm is sharpest shooting at f/4, at 100mm it moves to f/5.6, 135mm @ f/8, and 200mm seems to be a toss up anywhere from f/4 to f/11 (though f/8 seems to be the most even across the board). The chart that I used can be found here:www.dpreview.com/lensreviews/c…
Mounting this bad boy of a lens on a full frame body (5D/1Ds series) reveals that this lens’s “sweet spot” is certainly capable of out resolving the 5D. Looking at the chart again its 70mm @ f/5.6, 100mm @ f/8, 135mm @ f/8, and finally 200mm @ either f/8 or f/11. So for those of you who are into shooting at the sharpest apertures, you can print this review out and take the stats with you.
The last item on the list is the image stabilizer function of the lens. Canon claims that it lets you hand hold 3 stops down and I would have to agree, as I’ve shot subjects at 1/10th of a second hand held and still had very sharp results without blurring or smudging. There’s some debate as to whether you should buy the IS version or not. My personal opinion is if you can spring for the IS then go for it. Sure its $~400 more (last time I checked) but you’re already spending $1600+ on this lens, so it pays to have the IS right there rather then skimp out then realize you missed “the shot” because you couldn’t hold it steady enough due to camera shake.
So all in all I like the lens, The only downside to it is it's weight. It has great sharpness and decent bokah, the I.S. is almost a godsend to have if you shoot concerts and low light environments, but its front heavy design even on the 1D series bodies leads to wrists hurting or stiff necks after a number of hours shooting/walking around with it around your neck. For sample shots please check out www.zieba-photo.smugmug.com/Co…
Features!
And last but not least here are some features by those who support
 ! chosen by
 :thumb82161632::thumb82633070:
 :thumb81447577:

:thumb82535900:
 :thumb69181390:
 :thumb84652123:
 :thumb73861241::thumb78454538:
 :thumb86594471:

If you enjoyed this article please keep a watch out as we continue to give you tips and help on your photography by submitting bi-monthly news articles! Also if you want more tips or help be sure to check us out on dAmn where you can find our chat where someone is always there to help

Hello members of iPhotograph - Are you on FB?
First of all I want to give a huge thank you to all you guys for being part of this group. (No don't worry, we're not shutting down)
Right now I'm waiting to upgrade us back to supergroup until AFTER we switch to Eclipse next month. I'm not sure how groups will be doing on the new site so I don't want to jump into supergroup again until I can get it figured out. So right now just be sure to keep an eye on this space for an updates.
I'm also debating reviving the iPhotograph facebook page. Would there be any interest in that? Do a lot of you spend time on Facebook? It's on my list of things to do so we'll see!
13 years strong and 18k
Welcome! Introduce yourself here!
Hello!Hello iPhotograph Members! We have officially passed 8k members :omg: That's crazy! We've been around for YEARS and we're still going. Yes.... with a lot of hiatus's BUT we're still here and I think 2020 will be a lot more productive, or so I hope :lmao: Thank you all for sticking around!
The main purpose for THIS thread is I'd like everyone to introduce themselves. Tell us about YOU. What kind of photography you're into, how long you've been shooting, what gear you use, your photography goals for 2020, and your FAVORITE shot you've ever taken.
I want 2020 to be a good year for this group. I want us to expand, I want us to learn, I wa
Help Wanted! Join the iPhotograph Team!
Want to be a part of one of the biggest photography groups on Deviant Art? We're almost at 18k members. Can you believe that? :eager: BUT since we're so big, we need to expand our team. Which is where YOU come in :)
Do you feel pretty knowledgeable about photography or just looking to learn more and help out?
What we are looking for
:bulletpink: Someone to come up with a list of tips and tricks about photography
:bulletpink: People who want to write tutorials on different techniques (Bokeh, Night shooting, Sports, Etc)
:bulletpink: Photography history
:bulletpink: Weekly critiquers - These people will critique the photos that have be
Sorry.
Hey photographers.
I just wanted to apologize for the lack of updates on this page. Work and real life have taken over for most of my time. I'm trying my best to make time for the group and DA in general , it's just really hard. I miss being so active here. I'm going to try and get some more mods to run stuff when I'm not around. I know this group can be BIG. I just need help. Again thank you guys (whoever is still around) for your patience.
AshleyxBrooke (https://www.deviantart.com/ashleyxbrooke) :gummybear::heart:
Featured in Groups
© 2008 - 2024 iPhotograph
Comments23
Join the community to add your comment. Already a deviant? Log In
awesome ")